Nextcloud und Let's Encrypt
Im Artikel Nextcloud auf dem Raspberry Pi habe ich beschrieben wie ihr Nextcloud auf einem Raspberry Pi einrichtet. In diesem Beitrag erkläre ich auch, wie ihr eure Nextcloud-Installation auch von unterwegs über das Internet erreicht.
Codeberg
Dein Weg zur eigenen Nextcloud
Ihr benötigt für dieses Vorhaben entweder eine feste, statische IP-Adresse die euch vom ISP zugewiesen wird oder ihr verwendet einen DynDNS-Anbieter. Ich verwende hierfür den gleichen Anbieter und den gleichen Zugang, welchen ich schon für OpenVPN verwende 👉 Eigener VPN-Tunnel mit dem Raspberry Pi. In diesem Artikel habe ich auch schon beschrieben, wie der DynDNS-Zugang einzutragen ist.
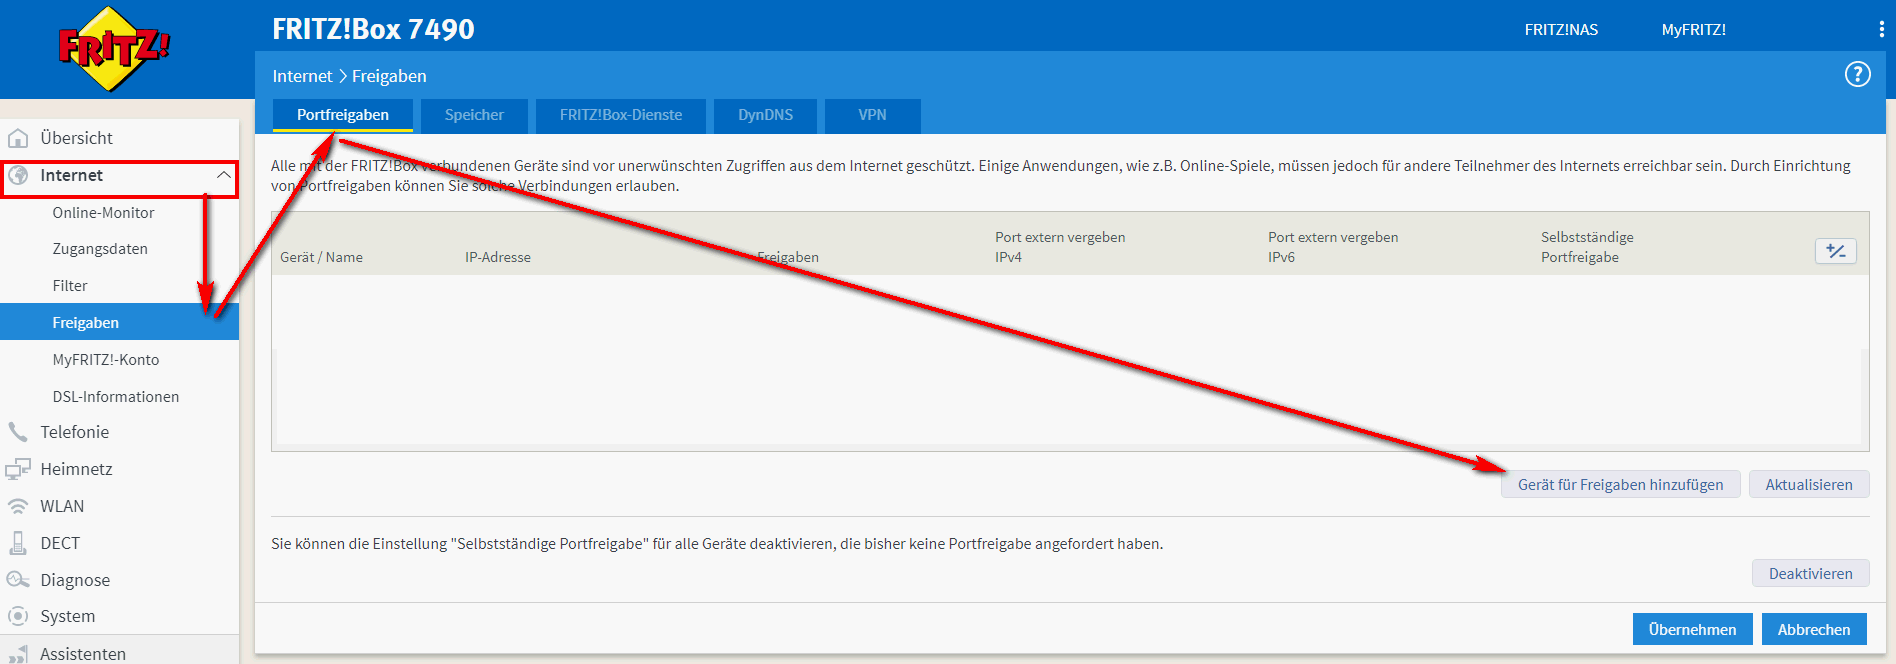
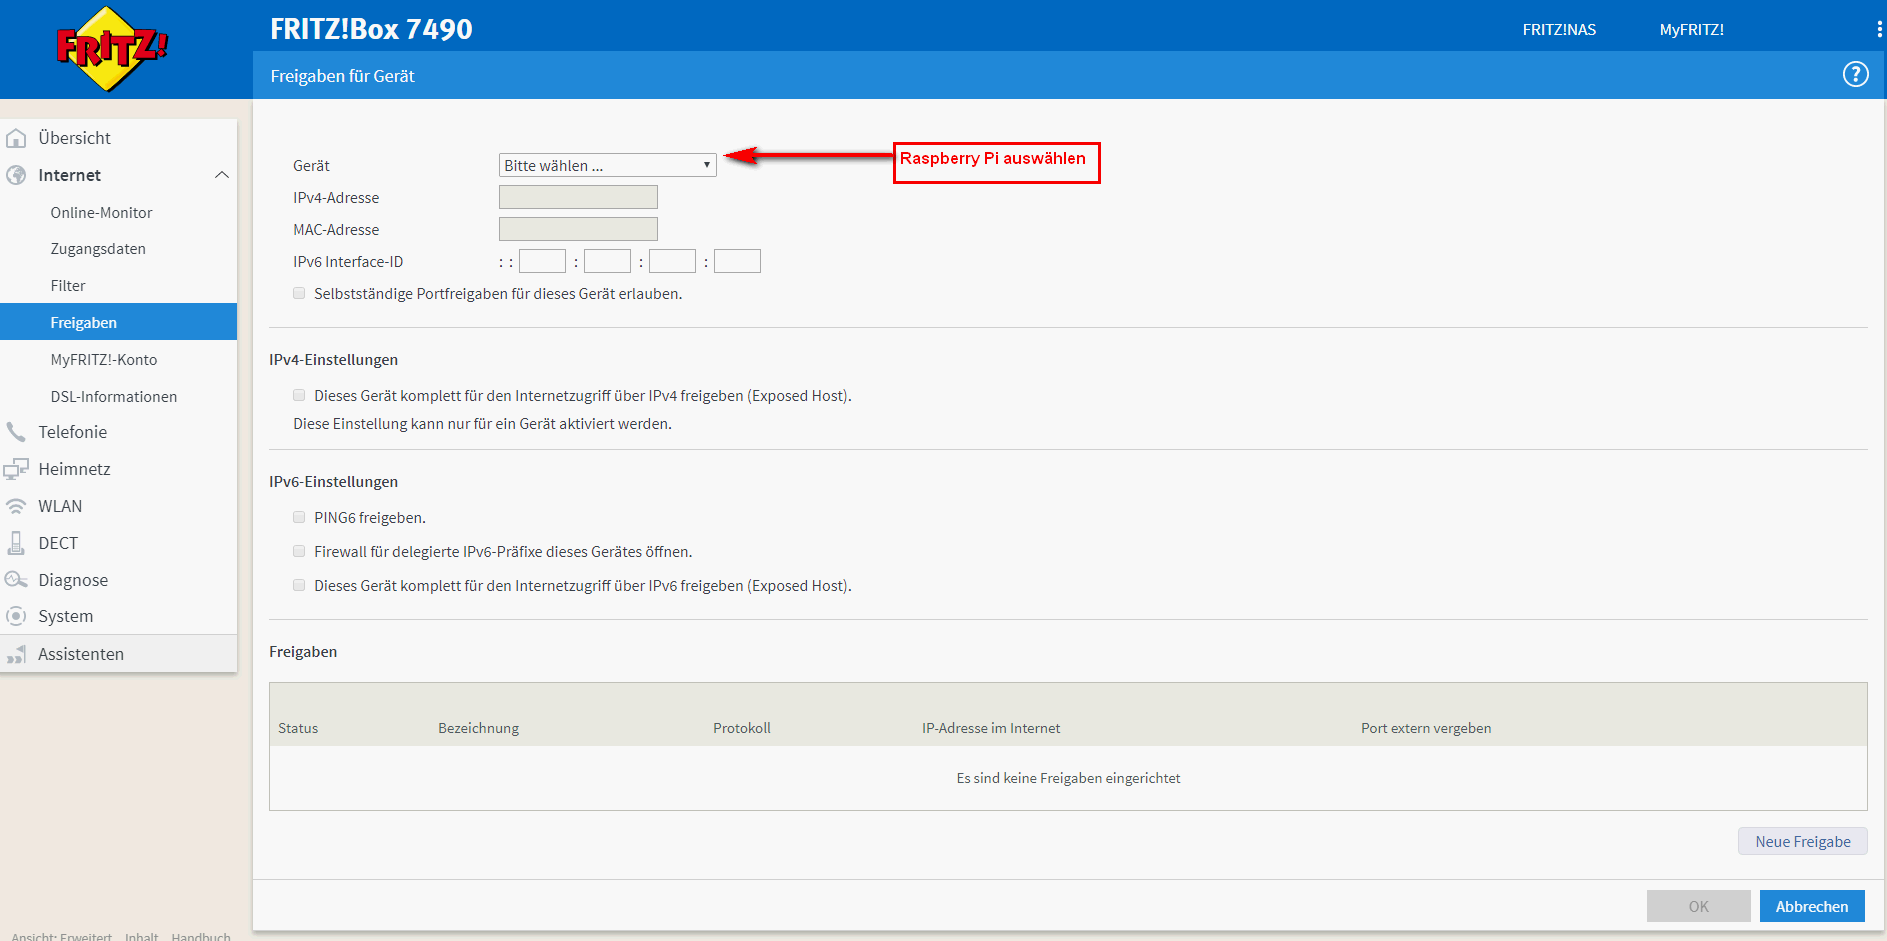
Bevor es an die Erstellung des Zertifikats und an die Konfiguration des Raspberry Pi geht, muss eine Portweiterleitung auf eurem Router eingerichtet werden. Ich führe da hier an einem Beispiel eines AVM-Routers aus.
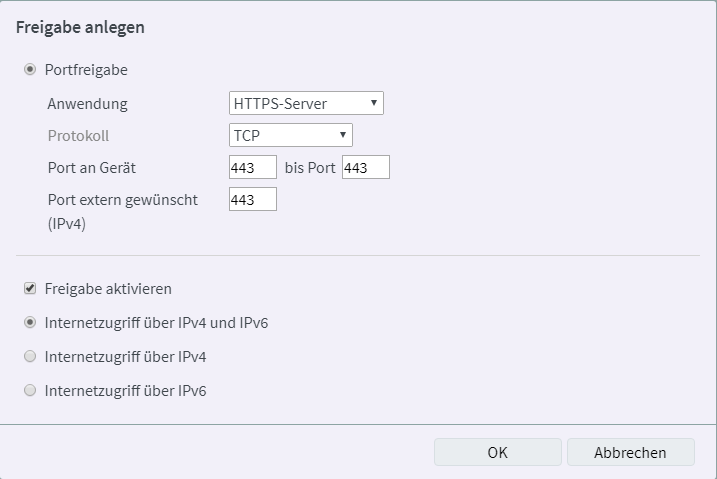
Die Portfreigabe für Nextcloud sieht wie folgt aus:

Nachdem ihr euren DynDNS-Anbieter und die Portfreigabe im Router eingetragen habt, können wir auf dem Raspberry Pi Let's Encrypt starten.
Ihr benötigt für die Konfiguration:
- eine gültige E-Mail-Adresse
- eueren DynDNS-Namen, den ihr im Router eingetragen habt
Startet die Einrichtung und folgt den Anweisungen. Let's Encrypt aktiviert in diesem Zuge automatisch SSL für euren Apache2 Webserver.
sudo a2enmod ssl
sudo a2enmod headers
sudo service apache2 restart
sudo apt install git -y
cd /etc
sudo git clone https://github.com/letsencrypt/letsencrypt
cd letsencrypt
sudo ./letsencrypt-auto
Update Dezember 2019 Kommt bei euch die Fehlermeldung "We were not be able to guess the right solution from your pip output.", dann hilft ggf. das Löschen der pip.conf-Datei.
sudo rm /etc/pip.conf
Die Beantragung eines neuen Let´s Encrypt-Zertifikat ist hier im Detail dargestellt.
pi@raspberrypi:/etc/letsencrypt $ sudo ./letsencrypt-auto
Bootstrapping dependencies for Debian-based OSes... (you can skip this with --no-bootstrap)
OK:1 http://archive.raspberrypi.org/debian buster InRelease
OK:2 http://raspbian.raspberrypi.org/raspbian buster InRelease
Paketlisten werden gelesen... Fertig
Paketlisten werden gelesen... Fertig
Abhängigkeitsbaum wird aufgebaut.
Statusinformationen werden eingelesen.... Fertig
augeas-lenses ist schon die neueste Version (1.11.0-3).
ca-certificates ist schon die neueste Version (20190110).
gcc ist schon die neueste Version (4:8.3.0-1+rpi2).
libaugeas0 ist schon die neueste Version (1.11.0-3).
libffi-dev ist schon die neueste Version (3.2.1-9).
libssl-dev ist schon die neueste Version (1.1.1d-0+deb10u2).
openssl ist schon die neueste Version (1.1.1d-0+deb10u2).
python ist schon die neueste Version (2.7.16-1).
python-dev ist schon die neueste Version (2.7.16-1).
python-virtualenv ist schon die neueste Version (15.1.0+ds-2).
virtualenv ist schon die neueste Version (15.1.0+ds-2).
0 aktualisiert, 0 neu installiert, 0 zu entfernen und 0 nicht aktualisiert.
Creating virtual environment...
Installing Python packages...
Installation succeeded.
Saving debug log to /var/log/letsencrypt/letsencrypt.log
Plugins selected: Authenticator apache, Installer apache
Enter email address (used for urgent renewal and security notices) (Enter 'c' to
cancel): <script language="JavaScript" type="text/javascript">var username = "email"; var hostname = "e-mail.de";document.write("<a href=" + "mail" + "to:" + username + "@" + hostname + ">" + username + "@" + hostname + "<\/a>")</script><a href="mailto:email@e-mail.de">email@e-mail.de</a>
- - - - - - - - - - - - - - - - - - - - - - - - - - - - - - - - - - - - - - - -
Please read the Terms of Service at
https://letsencrypt.org/documents/LE-SA-v1.2-November-15-2017.pdf. You must
agree in order to register with the ACME server at
https://acme-v02.api.letsencrypt.org/directory
- - - - - - - - - - - - - - - - - - - - - - - - - - - - - - - - - - - - - - - -
(A)gree/(C)ancel: a
- - - - - - - - - - - - - - - - - - - - - - - - - - - - - - - - - - - - - - - -
Would you be willing to share your email address with the Electronic Frontier
Foundation, a founding partner of the Let's Encrypt project and the non-profit
organization that develops Certbot? We'd like to send you email about our work
encrypting the web, EFF news, campaigns, and ways to support digital freedom.
- - - - - - - - - - - - - - - - - - - - - - - - - - - - - - - - - - - - - - - -
(Y)es/(N)o: n
No names were found in your configuration files. Please enter in your domain
name(s) (comma and/or space separated) (Enter 'c' to cancel): meine-nextcloud.de
Obtaining a new certificate
Performing the following challenges:
http-01 challenge for meine-nextcloud.de
Enabled Apache rewrite module
Waiting for verification...
Cleaning up challenges
Created an SSL vhost at /etc/apache2/sites-available/000-default-le-ssl.conf
Deploying Certificate to VirtualHost /etc/apache2/sites-available/000-default-le-ssl.conf
Enabling available site: /etc/apache2/sites-available/000-default-le-ssl.conf
Please choose whether or not to redirect HTTP traffic to HTTPS, removing HTTP access.
- - - - - - - - - - - - - - - - - - - - - - - - - - - - - - - - - - - - - - - -
1: No redirect - Make no further changes to the webserver configuration.
2: Redirect - Make all requests redirect to secure HTTPS access. Choose this for
new sites, or if you're confident your site works on HTTPS. You can undo this
change by editing your web server's configuration.
- - - - - - - - - - - - - - - - - - - - - - - - - - - - - - - - - - - - - - - -
Select the appropriate number [1-2] then [enter] (press 'c' to cancel): 2
Enabled Apache rewrite module
Redirecting vhost in /etc/apache2/sites-enabled/000-default.conf to ssl vhost in /etc/apache2/sites-available/000-default-le-ssl.conf
- - - - - - - - - - - - - - - - - - - - - - - - - - - - - - - - - - - - - - - -
Congratulations! You have successfully enabled https://meine-nextcloud.de
You should test your configuration at:
https://www.ssllabs.com/ssltest/analyze.html?d=meine-nextcloud.de
- - - - - - - - - - - - - - - - - - - - - - - - - - - - - - - - - - - - - - - -
IMPORTANT NOTES:
- Congratulations! Your certificate and chain have been saved at:
/etc/letsencrypt/live/meine-nextcloud.de/fullchain.pem
Your key file has been saved at:
/etc/letsencrypt/live/meine-nextcloud.de/privkey.pem
Your cert will expire on yyyy-mm-dd. To obtain a new or tweaked
version of this certificate in the future, simply run
letsencrypt-auto again with the "certonly" option. To
non-interactively renew *all* of your certificates, run
"letsencrypt-auto renew"
- Your account credentials have been saved in your Certbot
configuration directory at /etc/letsencrypt. You should make a
secure backup of this folder now. This configuration directory will
also contain certificates and private keys obtained by Certbot so
making regular backups of this folder is ideal.
- If you like Certbot, please consider supporting our work by:
Donating to ISRG / Let's Encrypt: https://letsencrypt.org/donate
Donating to EFF: https://eff.org/donate-le
pi@raspberrypi:/etc/letsencrypt $
Der Ordner /etc/letsencrypt enthält alle Informationen und das Zertifikat und sollte am besten zusätzlich noch gesichert werden
Da das Let's Encrypt nach 3 Monaten automatisch abläuft müssen wir es regelmäßig über einen CRON-Job erneuern lassen. Wir legen dazu eine neue Datei mit den Domaininformationen an:
cd /etc/letsencrypt
sudo nano cli.ini
rsa-key-size = 4096
text = True
redirect = True
renew-by-default = True
agree-tos = True
email = mail@mail.de
Ihr müsst in der Zeile email eure E-Mail-Adresse, die ihr bei der Erzeugung des Zertifikats verwendet habt eintragen.
Den Update-Prozess für das Zertifikats könnt ihr im Terminal bereits prüfen, ihr müsst lediglich mydyndns.dns.de durch eure Domain ersetzen.
sudo /etc/letsencrypt/letsencrypt-auto certonly --agree-tos --renew-by-default -a webroot --webroot-path /var/www/html/ -d mydyndns.dns.de
Läuft alles ohne Fehlermeldung durch, können wir den Cron-Job anlegen
sudo crontab -e
Tragt am Ende der Datei die Zeile mit dem angepassten Domainnamen ein.
@weekly root /etc/letsencrypt/letsencrypt-auto certonly --agree-tos --renew-by-default -a webroot --webroot-path /var/www/html/ -d mydyndns.dns.de
Das wars, damit wird euer Let's Encrypt Zertifikat regelmäßig automatisch erneuert, vorausgesetzt euer Pi läuft.
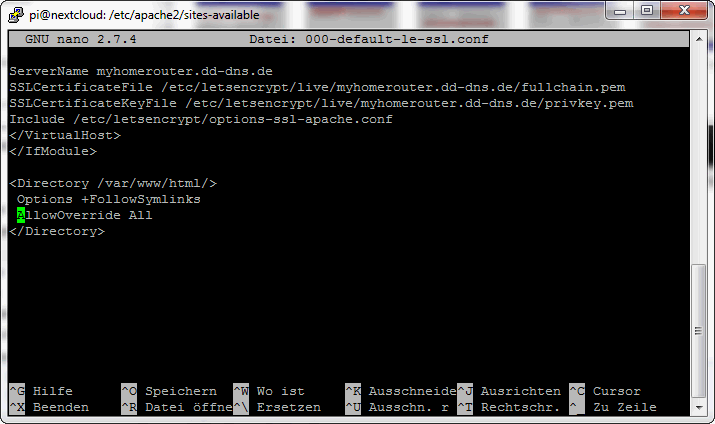
Es sind nun noch zwei kleine Änderungen an Dateien des Apache2 zu machen:
- /etc/apache2/sites-available/000-default.conf
- /etc/apache2/sites-available/000-default-le-ssl.conf
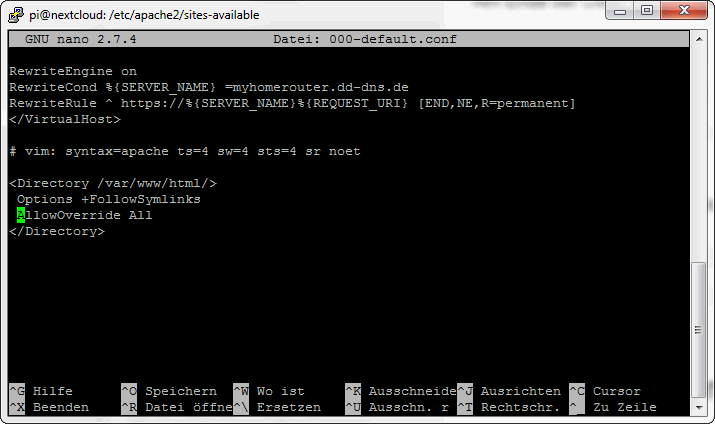
Dort sind jeweils am Ende die folgenden Zeilen einzutragen:
 Options +FollowSymlinks
 AllowOverride All
Bevor wir aber eine Änderung an den Dateien durchführen, legen wir noch ein Backup an.
cd /etc/apache2/sites-available
sudo cp 000-default.conf 000-default.conf-bak
sudo cp 000-default-le-ssl.conf 000-default-le-ssl.conf-bak
sudo nano 000-default.conf
sudo nano 000-default-le-ssl.conf
sudo service apache2 restart
Zum Schluss müssen wir Nextcloud noch mitteilen, dass wir eine eigene neue Domain haben, über die wir das Webportal aufrufen können. Die Konfiguration wird in der Datei /var/www/html/nextcloud/config/config.php gemacht.
Dort sucht ihr nach dem Abschnitt:
  'trusted_domains' =>
  array (
    0 => '192.xxx.xxx.xxx',

  ),
Fügt nach 0 => eine weitere Zeile hinzu und tragt dort eure Domain ein
  'trusted_domains' =>
  array (
    0 => '192.xxx.xxx.xxx',
    1 => 'mydyndns.dns.de',
  ),
Startet nun euren Apache neu und ihr solltet über eure Domain eure Nextcloud-Instanz erreichen.
sudo service apache2 restart
Nextcloud empfiehlt noch ein dem Beitrag Hardening and Security Guidance den Webtraffic ständig über SSL laufen zu lassen. Hierfür ist es erforderlich, dass ihr eine Virtual Hosts-Datei im Verzeichnis /etc/apache2/sites-available/ anlegt.
Der Name der Datei setzt sich zusammen aus eurem Domain-Namen und der Datei-Endung conf. z.B. mydyndns.dns.de.conf
In die Datei müsst ihr den folgenden Absatz einfügen
   ServerName mydyndns.dns.de
   Redirect permanent / https://mydyndns.dns.de/nextcloud
cd /etc/apache2/sites-available
sudo nano mydyndns.dns.de.conf
sudo service apache2 restart
Codeberg
Dein Weg zur eigenen Nextcloud
Gib mir gerne einen Kaffee ☕ aus ❗️
Wenn dir meine Beiträge gefallen und geholfen haben, dann kannst du mir gerne einen Kaffee ☕️ ausgeben.
![]() •
• ![]()
Bitcoin Address: bc1qfuz93hw2fhdvfuxf6mlxlk8zdadvnktppkzqzj
Follow Me❗️